
note
This article was last updated on February 9, 2024, 2 years ago. The content may be out of date.
Google released the Gemini model recently, and it’s free to use. We can use it to create our own chatbot.
We’ll start with the introduction to Telegram bots because they are also free and can handle text and image messages. Bots on other platforms should be similar.
info
There is a Golang library providing Telegram bots api wrappers. We don’t use it in this post because the api is very easy and self-explanatory.
What’s a Bot
Bots are small applications that users can interact in a variety of ways: They can receive texts, images and other types of messages from users. They can also respond with different types of messages. Their full features can be seen here. Since we’re interested in chatting only, that will be our focus, and we’ll ignore other features for now.
What’s Special about a Bot
Bots, unlike users, are programs. They don’t need a phone number to set up and are connected to their owner’s server, which processes inputs and requests from users.
Their main differences are, according to the official manual:
- Bots don’t have ‘last seen’ or online statuses – instead they show a ‘bot’ label in the chat.
- Bots have limited cloud storage – older messages may be removed by the server shortly after they have been processed.
- Bots can’t start conversations with users. A user must either add them to a group or send them a message first. People can search for your bot’s username or start a chat via its unique
t.me/bot_usernamelink. - By default, bots added to groups only see relevant messages in the chat (see Privacy Mode).
- Bots never eat, sleep or complain (unless expressly programmed otherwise).
Implementing a Telegram Bot
Now that we know the basics, we can begin to implement a simple Telegram bot.
Creating a Bot
To create a bot, we need to contact BotFather which itself is a bot. Using the /newbot command, it will guide us to create a new bot step by step. By the end of this process, we will receive the token of the bot.

After we created a bot, we need to let the bot receive messages to begin its interactions.
Receiving Messages
There are two mutually exclusive ways a bot can receive messages:
- Webhook. Telegram will send messages to our url to let us know there is a new message. Telegram will retry a number of times if the request is not successful.
- Polling. We can poll Telegram about pending messages manually. We need to manage polling frequency and confirmed messages ourselves.
Either way, we get Update object(s). In this post, we’ll use the webhook method because it’s simpler.
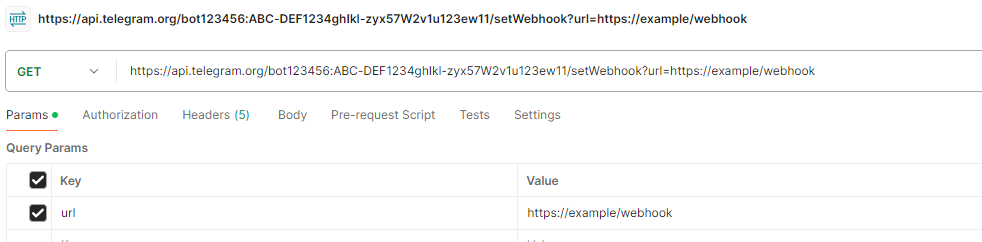
We need to set the webhook url and configure our server to pass requests on this url to our server. We can use Postman to set up the webhook:
Using Caddy to reverse proxy to our bots will automatically secure our bots:
example.com

reverse_proxy /webhook ${bot address}
note
All methods of a Telegram bot follows the same pattern, just change the last part of the path to call a different method. The parameters can be encoded in query parameters, post forms, multipart forms or json bodies. The exception is that only multipart forms can be used to upload files.
Handling Messages
There are many types of messages in Telegram. We only focus on text and image messages since Gemini can process these types of input data. We also need to know who sends these messages to build up chat history for a user.
We define the related structs as following:
type From struct {
	Id           int    `json:"id"`
	IsBot        bool   `json:"is_bot"`
	FirstName    string `json:"first_name"`
	LastName     string `json:"last_name"`
	LanguageCode string `json:"language_code"`
}

type Message struct {
	MessageId int  `json:"message_id"`
	From      From `json:"from"`
	Chat      struct {
		Id        int    `json:"id"`
		FirstName string `json:"first_name"`
		LastName  string `json:"last_name"`
		Type      string `json:"type"`
	} `json:"chat"`
	Date     int    `json:"date"`
	Text     string `json:"text"`
	Entities []struct {
		Offset int    `json:"offset"`
		Length int    `json:"length"`
		Type   string `json:"type"`
	} `json:"entities"`
	MediaGroupId string `json:"media_group_id"`
	Photo        []struct {
		FileId       string `json:"file_id"`
		FileUniqueId string `json:"file_unique_id"`
		FileSize     int    `json:"file_size"`
		Width        int    `json:"width"`
		Height       int    `json:"height"`
	} `json:"photo"`
	Caption string `json:"caption"`
}

type Update struct {
	UpdateId      int           `json:"update_id"`
	Message       Message       `json:"message"`
}
To receive messages from the webhook, we write:
func chat(writer http.ResponseWriter, request *http.Request) {
	var (
		update Update
		err    = json.NewDecoder(request.Body).Decode(&update)
	)
	if err != nil {
		http.Error(writer, http.StatusText(http.StatusBadRequest), http.StatusBadRequest)
		return
	}

	// message handling
}

func main() {
	panic(http.ListenAndServe("${bot address}", http.HandlerFunc(chat)))
}
tip
We can use io.TeeReader to help us understand Telegram requests and responses better.
We are interested in interactions between users and the bot in a private chat instead of a group chat. We can extract the id of the user in the from field of the message.
To reply to a user, first the user needs to start the interaction. In the chat field of the message, we can find the chat id.
We can learn more about the message type here.
Sending Messages
After the bot receives a message, the bot needs to process then reply. We’ll leave the processing part in the next post of this series. In this part we learn how to send a message.
In the previous step, we have acquired the chat id. We only need to supply chat_id and text to send a message. We may want to keep the message id in memory if we want to update the message later, ie, updating messages in a streaming fashion to improve interactions.
To send a message by calling the api:
type SendMessageResponse struct {
	Ok     bool    `json:"ok"`
	Result Message `json:"result"`
}

func sendMessage(id int, message string) (int, error) {
	resp, err := http.PostForm("https://api.telegram.org/bot"+botToken+"/sendMessage", url.Values{
		"chat_id": []string{strconv.Itoa(id)},
		"text":    []string{message},
	})
	if err != nil {
		return 0, err
	}

	var r SendMessageResponse
	err = json.NewDecoder(resp.Body).Decode(&r)
	_ = resp.Body.Close()
	return r.Result.MessageId, err
}
To update a message text:
func updateMessage(chatID, messageID int, message string) error {
	resp, err := http.PostForm("https://api.telegram.org/bot"+botToken+"/editMessageText", url.Values{
		"chat_id":    []string{strconv.Itoa(chatID)},
		"message_id": []string{strconv.Itoa(messageID)},
		"text":       []string{message},
	})
	if err != nil {
		return err
	}

	_, _ = io.Copy(io.Discard, resp.Body)
	_ = resp.Body.Close()
	return nil
}
info
Although Telegram supports message formatting and the output of Gemini is in Markdown format, we don’t use it because only a subset of Markdown features are supported by Telegram.
We can send messages directly to the webhook request. It’s usually faster than making a Telegram api call, but we can’t know the message id of the sent message. The message can be sent this way:
func sendMessageInline(writer http.ResponseWriter, id int, message string) {
	values := url.Values{
		"method":  []string{"sendMessage"},
		"chat_id": []string{strconv.Itoa(id)},
		"text":    []string{message},
	}

	writer.Header().Set("Content-Type", "application/x-www-form-urlencoded")
	_, _ = io.WriteString(writer, values.Encode())
}
In the next post, we’ll talk about integrating Gemini with our chatbot.